User Guide
HRConnect is a desktop app designed to streamline the allocation of human resources to projects within a company.
It is optimized for rapid use by project managers and office professionals who are skilled at typing, while still providing the benefits of a Graphical User Interface (GUI). If you prefer typing, HRConnect allows you to perform human resource management tasks much faster than other mouse-reliant apps.
![]() Note on copying commands from PDF version of User Guide:
Note on copying commands from PDF version of User Guide:
If you are using a PDF version of this document, be careful when copying and pasting commands that span multiple lines, as space characters surrounding line-breaks may be omitted when copied over to the application.
![]() Notes on User Guide formatting:
Notes on User Guide formatting:
The user guide contains formatting to highlight important info. The standards used are as follows:
-
code typeface: Commands or command formats - Bold: Essential information
- RED COLOR: Caution, take note
- Hyperlink: Links to another section of the user guide, or a relevant page.
- Italics + Hyperlink: Technical terms available in glossary
Table of Contents
- Table of Contents
- Quick Start
- Features
- FAQ
- Known issues
- Command Summary
- Glossary
Quick Start
Start here if you are new to HRConnect.
-
Ensure you have Java 17 or above installed in your computer.
-
Download the latest
.jarfile from here. -
Copy the file to the folder you want to use as the home folder for your HRConnect. This folder will be used to store saved data and preferences.
-
Double-click the
.jarfile in the folder you placed.- (If this does not work: Open a command terminal, use the command
cd [folder path]to navigate into the folder you put the.jarfile in, and use the commandjava -jar HRConnect.jarto run the application.)
- (If this does not work: Open a command terminal, use the command
A GUI similar to the screenshot below should appear in a few seconds. Note how the app contains some sample data.
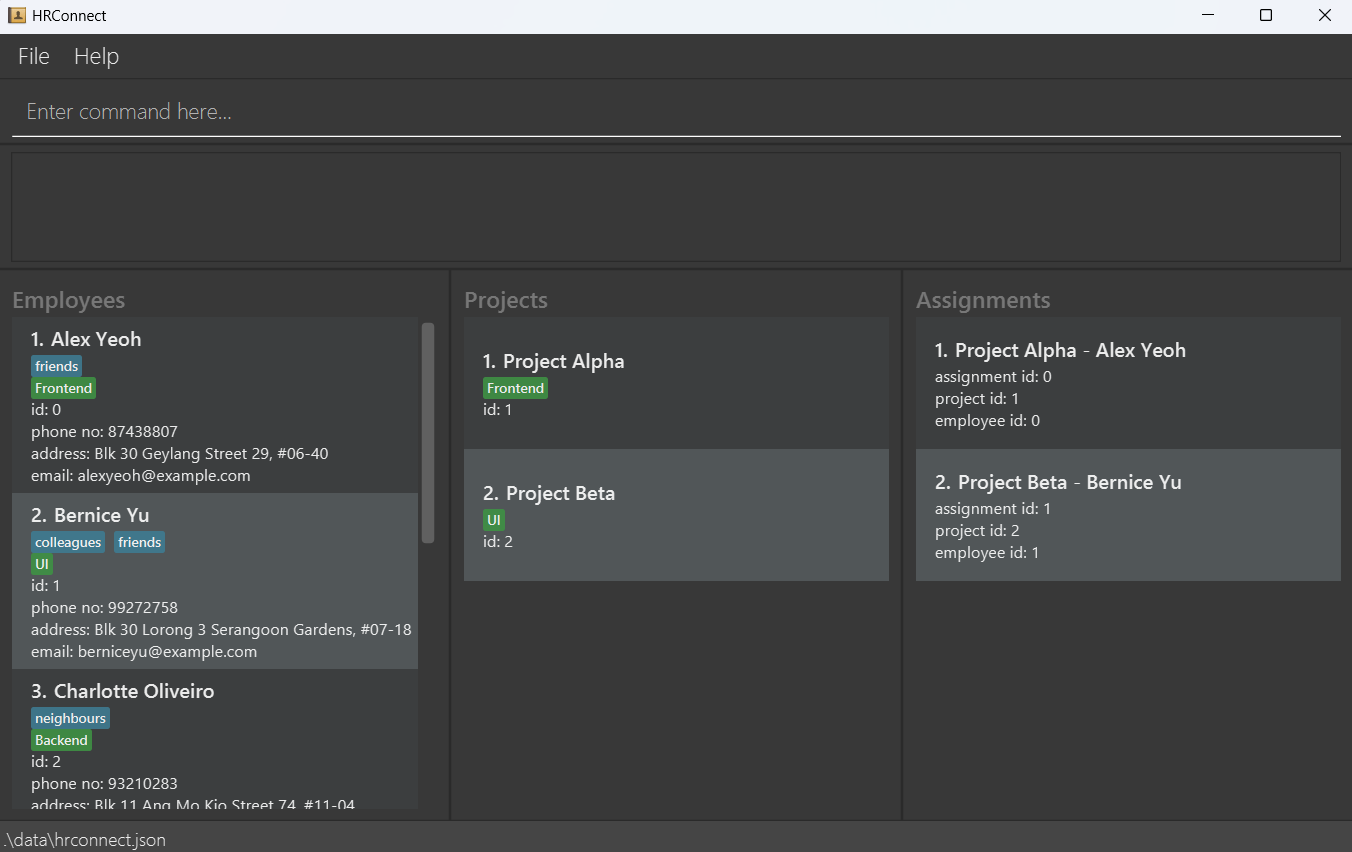
HRConnect keeps track of Employees, Projects and the assignments between them. HRConnect commands are tailored for managing these three items easily.
Type the command in the command box and press Enter to execute it. e.g. typing help and pressing Enter will open the help window.
Some commands to get started
-
listemployees: Lists all employees. -
add id/6 n/John Doe p/98765432 e/johnd@example.com a/John street, block 123, #01-01: Adds a contact namedJohn Doeto the Address Book. -
delete 3: Deletes the 3rd contact in the displayed list. -
clear: Deletes all contacts. -
listprojects: Lists all projects. -
addproject pid/3 pn/Project Charlie s/Backend: Adds a project namedProject Charliewith skillBackend. -
deleteproject 3: Deletes the 3rd project in the displayed project list. -
clearproject: Deletes all projects. -
assign aid/1 pid/3 id/1: AssignsBernice YutoProject Charlie. -
listassignments: Lists all assignments. -
unassign aid/1: Undoes the assignment with Assignment ID 1. -
exit: Exits the app.
Refer to the Features below for details of each command.
Features
![]() Notes about the command format:
Notes about the command format:
- Words in
UPPER_CASEare the parameters to be supplied by the user.
- e.g. in
add n/NAME,NAMEis a parameter which can be used asadd n/John Doe.
- e.g. in
- Items in square brackets are optional.
- e.g.
n/NAME [t/TAG]can be used asn/John Doe t/friendor asn/John Doe.
- e.g.
- Items with
… after them can be used multiple times including zero times.
- e.g.
[t/TAG]…can be left out (i.e. used 0 times), used ast/friend,t/friend t/familyetc.
- e.g.
-
Items can be in any order.
e.g.n/NAME p/PHONE_NUMBERandp/PHONE_NUMBER n/NAMEare the same. -
Unnecessary parameters (i.e. not mentioned in command format) will be ignored.
-
Command words and prefixes are case-sensitive.
e.g.EDIT 1 n/Johnandedit 1 N/Johnwill raise an error.
Viewing help : help
Shows a message explaining how to access the help page.

Format: help
Employee commands
Adding an employee : add
Adds an employee to the address book.
Format: add id/EMPLOYEE_ID n/NAME p/PHONE_NUMBER e/EMAIL a/ADDRESS [t/TAG]… [s/SKILL]…
- Employee Id must be: Numeric, no spaces, unique amongst employees
- Employee IDs uniquely identify each employee.
- Employee IDs are compared numerically.
0001is treated the same as1.
- Name must be: Alphanumeric, spaces allowed
- Names which require special characters should be spelt out in full. e.g.
Nagaratnam s/o Suppiahshould be spelt out asNagaratnam son of Suppiah
- Names which require special characters should be spelt out in full. e.g.
- Phone Number must be: Numeric, no spaces, at least 3 digits long
- Email must be: of the format
local-part@domainand follow these constraints:- The local-part should only contain alphanumeric characters and the special characters +_.-
- The local-part may not start or end with special characters.
- This is followed by a ‘@’ and then a domain name. The domain name is made up of domain labels separated by periods (e.g.
u.nus.edu).
- Address must be: Any characters are valid (except for
/) - Skills and tags must be: Alphanumeric, no spaces, each should be 50 characters or fewer
![]() Note employee details:
Note employee details:
Since each employee is uniquely identified by their employee ID, users can add employees who share the same name, or who have a common department-wide phone number, email, or address.
Examples:
add id/1 n/John Doe p/98765432 e/johnd@example.com a/John street, block 123, #01-01add id/2 n/Betsy Crowe t/friend e/betsycrowe@example.com a/Newgate Prison p/1234567 t/criminal s/lockpicking
Expected output:
- System message noting success and details of employee edited
Listing all employees : listemployees
Shows a list of all employees in the address book.
Format: listemployees
Expected output:
- System message noting success
- All employees shown in the displayed employee list
- Result for
listemployeeswith sample data: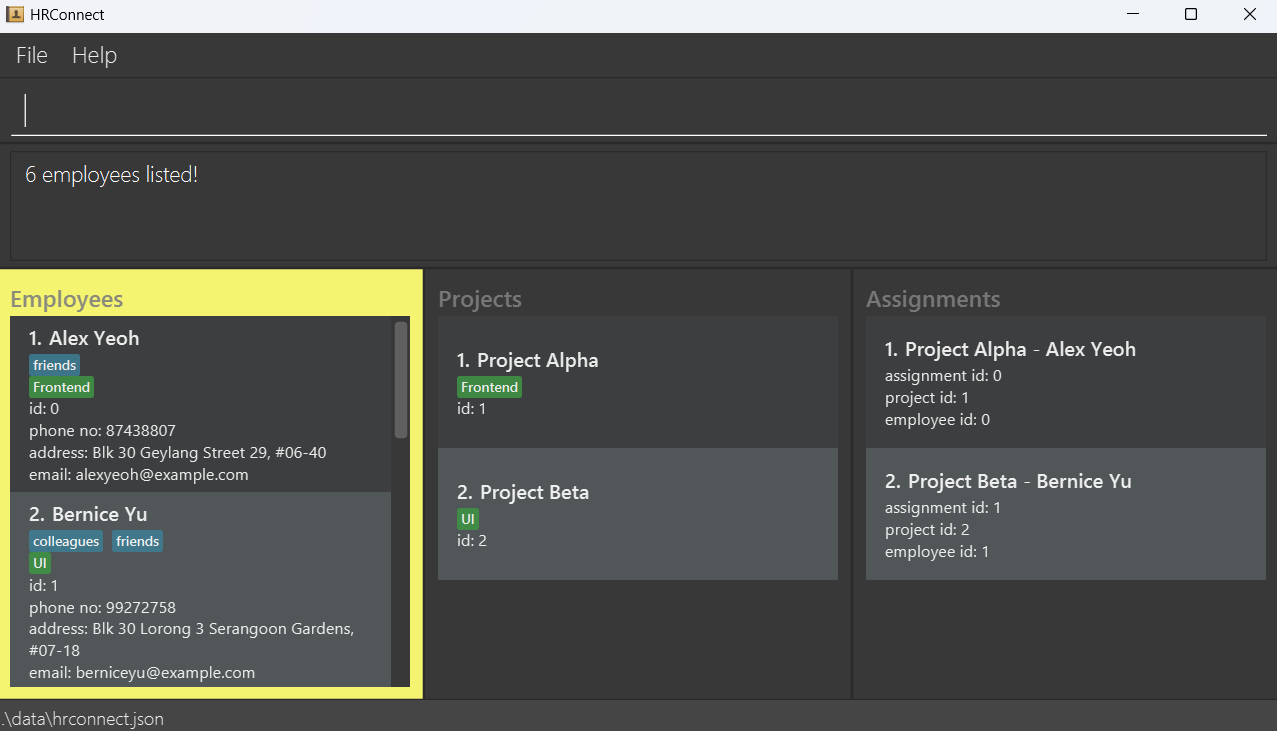
Editing an employee : edit
Edits an existing employee in the address book.
Format: edit INDEX [n/NAME] [p/PHONE] [e/EMAIL] [a/ADDRESS] [t/TAG]… [s/SKILL]…
- Edits the employee at the specified
INDEX. The index refers to the index number shown in the displayed employee list. The index must be a positive integer 1, 2, 3, … - At least one of the optional fields must be provided.
- Existing values will be updated to the input values.
- When editing tags, the existing tags of the employee will be removed i.e. adding of tags is not cumulative.
- When editing skills, the existing skills of the employee will be removed i.e. adding of skills is not cumulative.
- You can remove all the employee’s tags by typing
t/without specifying any tags after it. - You can remove all the employee’s skills by typing
s/without specifying any skills after it. - You cannot edit an employee’s employee id. More specifically, you are not allowed to specify
id/EMPLOYEEIDin theeditcommand.
Examples:
-
edit 1 p/91234567 e/johndoe@example.comEdits the phone number and email address of the 1st employee to be91234567andjohndoe@example.comrespectively. -
edit 2 n/Betsy Crower t/Edits the name of the 2nd employee to beBetsy Crowerand clears all existing tags.
Expected output:
- System message noting success and details of employee edited
Filtering employees by skills : filter
Finds employees who have at least one skill or tag matching at least one of the search items.
Format: filter [s/SKILL]... [t/TAG]...
- The search is case-insensitive. e.g.
s/webdevwill matchs/WebDev. - The order of the search items does not matter. e.g.
s/frontend s/backend t/swe t/devopswill also match contacts witht/swe s/frontend t/devops s/backend. - Only the skills and tags are searched.
- Only full words will be matched. e.g.
s/databasewill not match the skilldatabases. - All employees who have at least one skill or tag matching any one search item will be returned.
Examples:
-
filter s/frontendreturns all employees with the skillfrontend. -
filter s/frontend t/swereturns all employees who have either the skillfrontend, the tagswe, or both.
Expected output:
- System message noting success
- Employees with skills above shown in the displayed employee list
- Result for
filter t/colleagues: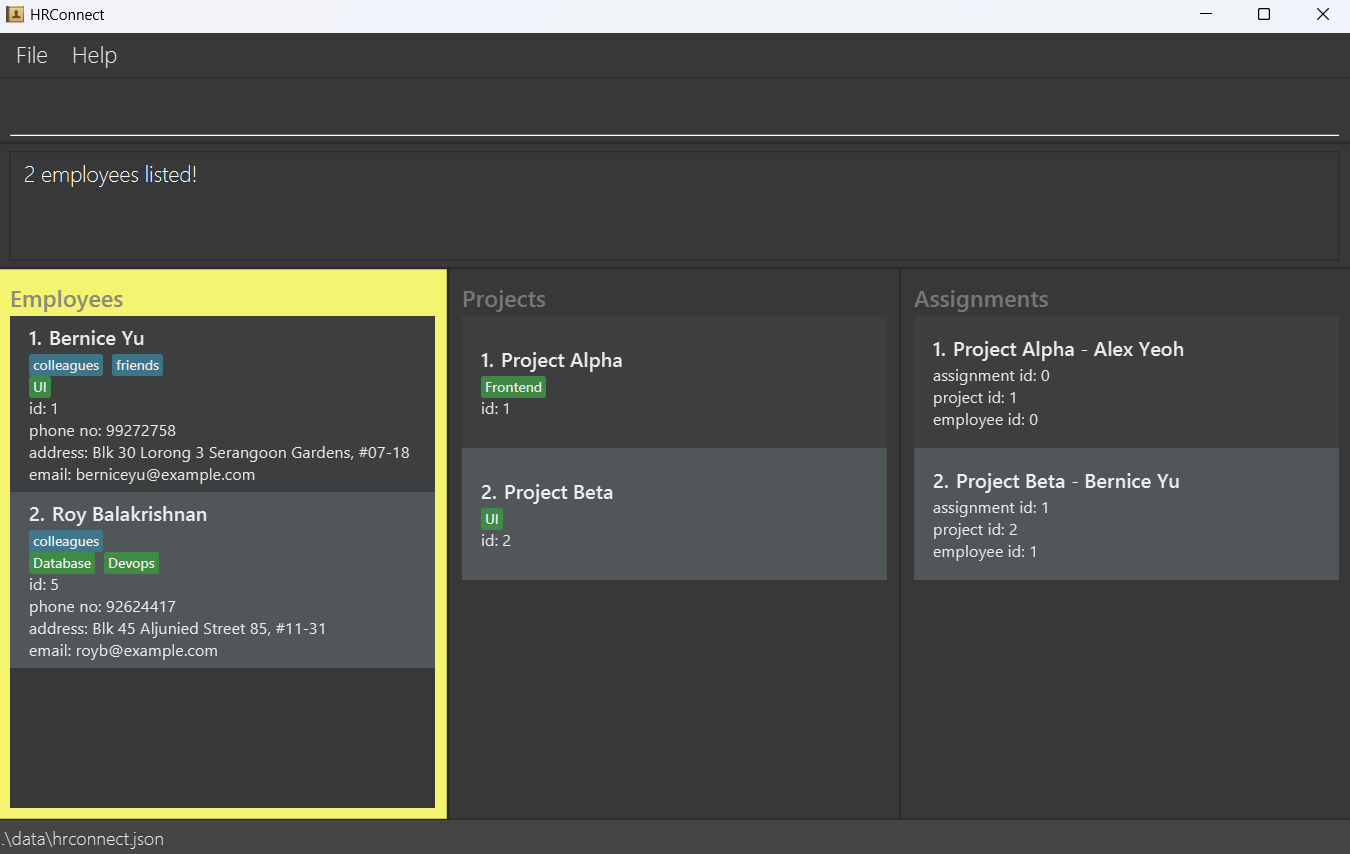
Locating employees by name : find
Finds employees whose names contain any of the given keywords.
Format: find KEYWORD [MORE_KEYWORDS]
- The search is case-insensitive. e.g.
hanswill matchHans - The order of the keywords does not matter. e.g.
Hans Bowill matchBo Hans - Only the name is searched.
- Only full words will be matched. e.g.
Hanwill not matchHans - Employees matching at least one keyword will be returned (i.e.
ORsearch). e.g.Hans Bowill returnHans Gruber,Bo Yang
Examples:
-
find JohnreturnsjohnandJohn Doe -
find alex davidreturnsAlex Yeoh,David Li
Expected output:
- System message noting success
- Employees matching criteria above shown in the displayed employee list
- Result for
find alex davidwith sample data: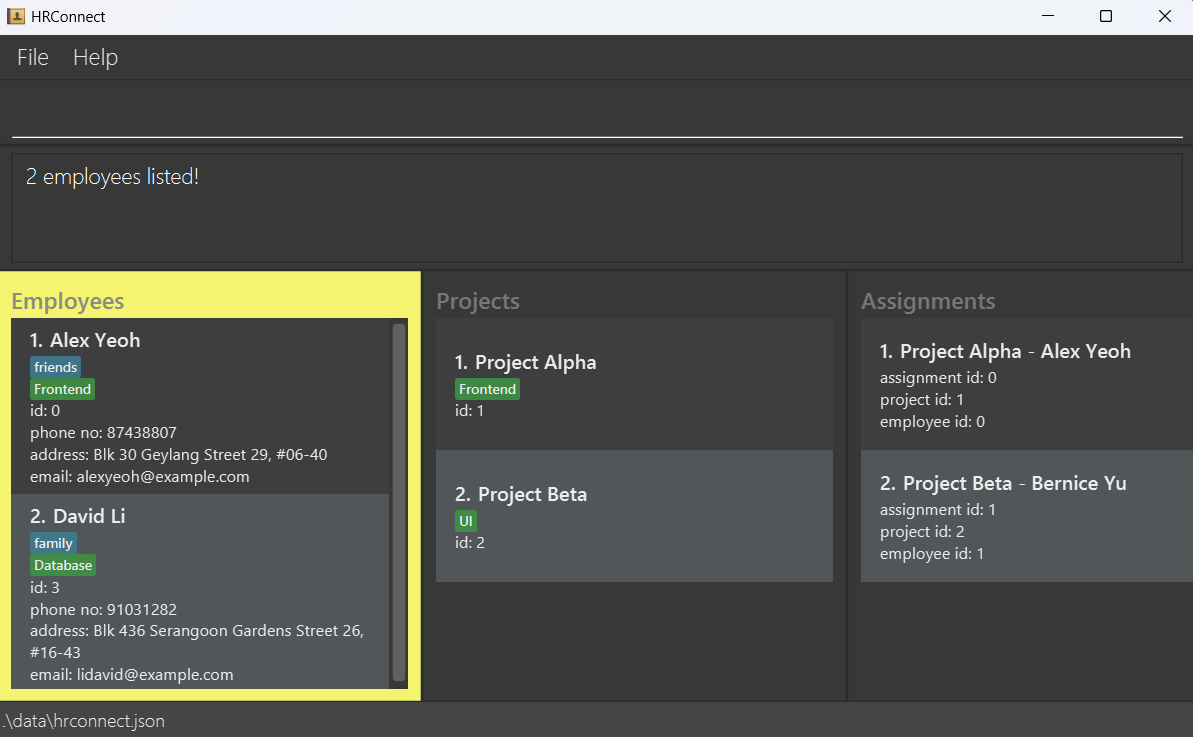
Deleting an employee : delete
Deletes the specified employee and all its assignments from the address book.
Format: delete INDEX
- Deletes the employee at the specified
INDEX. - The index refers to the index number shown in the displayed employee list.
- The index must be a positive integer 1, 2, 3, …
Examples:
-
listemployeesfollowed bydelete 2deletes the 2nd employee in the address book. -
find Betsyfollowed bydelete 1deletes the 1st employee in the results of thefindcommand.
Expected output:
- System message noting success
- Deleted employee vanishes from displayed employee list
Clearing all employee entries : clear
Clears all employee entries from the address book.
Format: clear
Expected output:
- System message noting success
- Displayed employee list becomes empty
Project commands
Adding a project : addproject
Adds a new project to HRConnect.
Format: addproject pid/PROJECT_ID pn/PROJECT_NAME [s/SKILL]...
- Project Id must be: Numeric, no spaces, unique amongst projects
- Project IDs uniquely identify each project.
- Project IDs are compared numerically.
0001is treated the same as1.
- Project Name must be: Alphanumeric, spaces allowed
- Skills must be: Alphanumeric, no spaces, each should be 50 characters or fewer
Examples:
addproject pid/1 pn/Project Alphaaddproject pid/2 pn/Website UI Overhaul s/Frontend s/React
Expected output:
- System message noting success and id + name of project added
Listing all projects : listprojects
Shows a list of all stored projects.
Format: listprojects
Expected output:
- System message noting success, including number of projects listed
- All projects shown in the displayed project list
- Result of
listprojectswith sample data: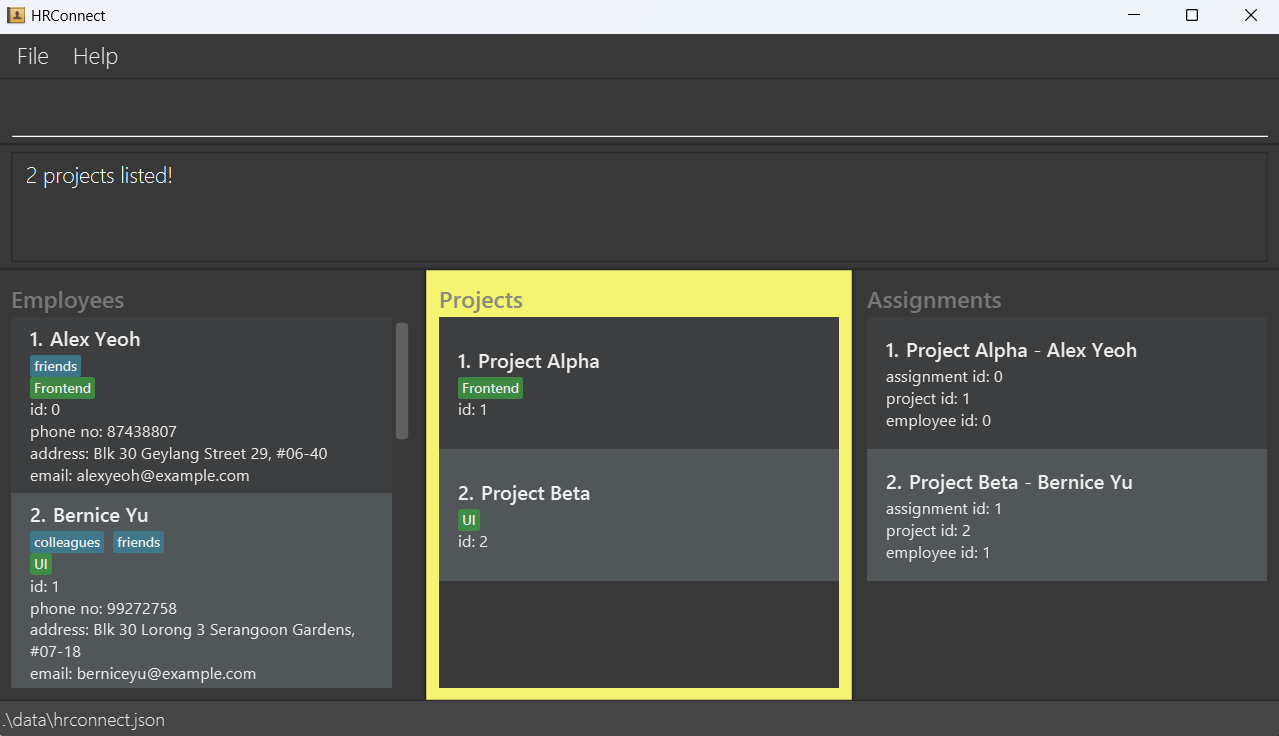
Listing all members of a project : listprojectmembers
Shows a list of all project members of the specified project.
listemployees and listassignments commands to reset the display to show all employees and assignments again.
Format: listprojectmembers pn/PROJECT_NAME
- PROJECT_NAME is case-sensitive. e.g.
Projectwill not matchproject - Only the full project name will be matched. e.g.
ProjectorAlphawill not matchProject Alpha
Expected output:
- System message noting success, including number of members listed
- All members shown in the displayed member list
Editing a project : editproject
Edits an existing project in the address book.
Format: editproject INDEX [pn/NAME] [s/SKILL]…
- Edits the project at the specified
INDEX. The index refers to the index number shown in the displayed project list. The index must be a positive integer 1, 2, 3, … - At least one of the optional fields must be provided.
- Existing values will be updated to the input values.
- When editing skills, the existing skills of the project will be removed i.e. adding of skills is not cumulative.
- You can remove all the project’s skills by typing
s/without specifying any skills after it. - You cannot edit a project’s id. More specifically, you are not allowed to specify
pid/PROJECTIDin theeditcommand.
Examples:
-
editproject 1 pn/ALPHAEdits the project name of the 1st project to beALPHA. -
editproject 2 s/CybersecurityEdits the skill of the 2nd project to beCybersecurity.
Expected output:
- System message success and details of project edited
Finding projects by name : findproject
Finds projects whose names contain any of the given keywords.
Format: findproject KEYWORD [MORE_KEYWORDS]
- The search is case-insensitive. e.g.
Projectwill matchproject - The order of the keywords does not matter. e.g.
Project Alphawill matchAlpha Project - Only the project name is searched.
- Only full words will be matched. e.g.
Projdoes not matchProject - Any project matching at least one keyword will be returned. e.g.
Projectwill returnProject AlphaandProject Beta, etc
Examples:
findproject projectfindproject Alpha Beta
Expected output:
- System message noting success
- Projects matching criteria above shown in the displayed project list
Deleting a project : deleteproject
Deletes the specified project and all its assignments from HRConnect.
Format: deleteproject INDEX
- Deletes the project at the specified
INDEX - The index refers to the index number shown in the displayed project list.
- The index must be a positive integer 1, 2, 3, …
Examples:
-
listprojectsfollowed bydeleteproject 2deletes the 2nd project shown. -
findproject Alphafollowed bydeleteproject 1deletes the 1st project in the results of thefindprojectcommand.
Expected output:
- System message noting success
- Deleted project vanishes from displayed project list
Clear all project entries : clearproject
Clears all project entries from HRConnect.
Format: clearproject
Expected output:
- System message noting success
- Displayed project list becomes empty
Assignment commands
Create assignment : assign
Creates an assignment between an Employee and a Project.
Format: assign aid/ASSIGNMENT_ID pid/PROJECT_ID id/EMPLOYEE_ID
- Assignment Id must be: Numeric, no spaces, unique amongst assignments
- Assignment IDs uniquely identify each assignment.
- Assignment IDs are compared numerically.
0001is treated the same as1.
- The
PROJECT_IDmust belong to an existing project. - The
EMPLOYEE_IDmust belong to an existing employee. - There must not be an existing assignment with the same
PROJECT_IDandEMPLOYEE_ID.
Examples:
assign aid/1 pid/1 id/1
Expected output:
- System message noting success and information about assignment added
List assignments : listassignments
Shows a list of all stored assignments.
Format: listassignments
Expected output:
- System message noting success
- All assignments shown in the assignment display list
- Result of
listassignmentswith sample data: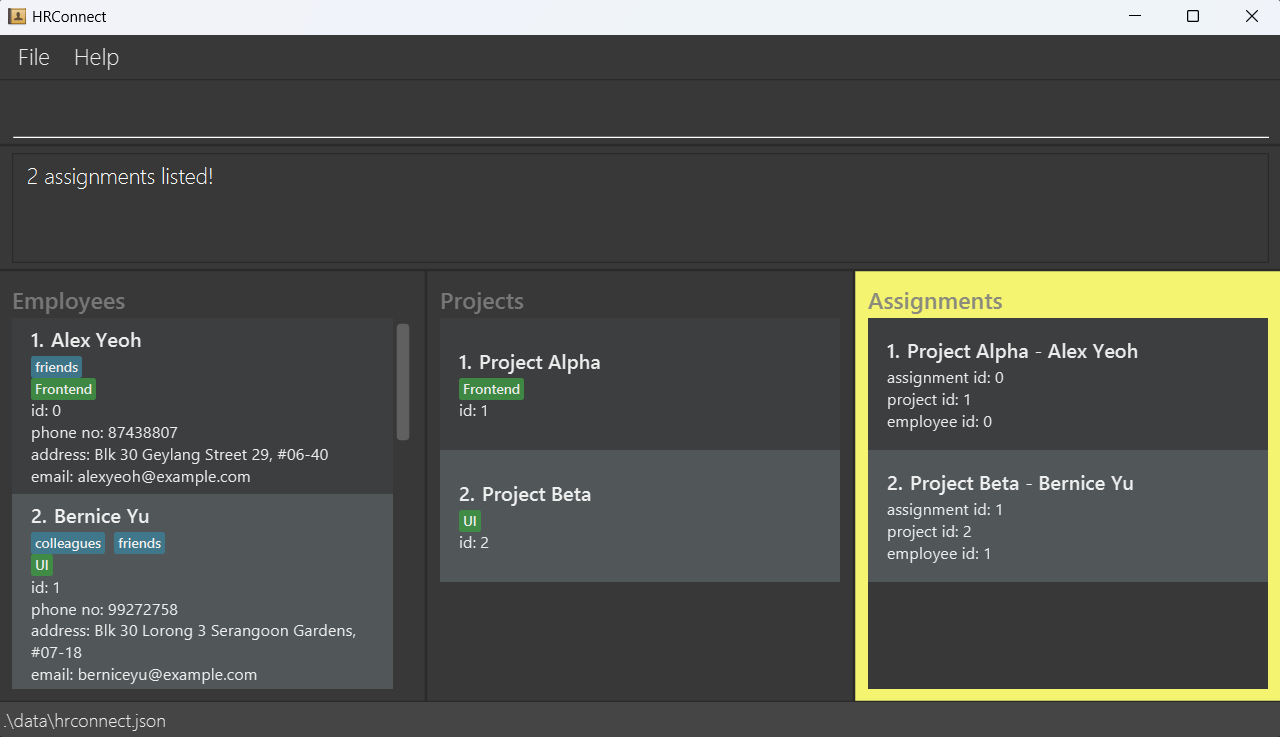
Delete assignment : unassign
Deletes an assignment between an Employee and a Project.
This does not delete the Employee nor the Project.
Format: unassign aid/ASSIGNMENT_ID
- The
ASSIGNMENT_IDmust belong to an existing assignment.
Examples:
unassign aid/1
Expected output:
- System message noting the
ASSIGNMENT_IDof the assignment removed.
Exiting the program : exit
Exits the program.
Format: exit
Traversing command history
HRConnect keeps a log of past commands entered, up to a maximum of the 50 latest commands. To access past commands, make sure that your cursor is in the command box (indicated within the red box below), then press the up (↑) and down (↓) arrow keys.

- Press the up arrow key (↑) to navigate to the previous command.
- Press the down arrow key (↓) to navigate to the next command.
Previously entered commands are saved to disk (up to a maximum of 50 commands). Users can navigate to previous commands from earlier sessions as commands are saved across exit(s) of the application.
Saving the data
HRConnect data are saved in the hard disk automatically after any command that changes the data. There is no need to save manually.
Editing the data file

HRConnect data is saved automatically as a JSON file [JAR file location]/data/hrconnect.json.
Advanced users are welcome to update data directly by editing this data file.
Furthermore, certain edits can cause HRConnect to behave in unexpected ways (e.g., if a value entered is outside the acceptable range). Therefore, edit the data file only if you are confident that you can update it correctly.
If you decide to edit employee and project IDs directly in the data file, take extra caution and make sure that relevant assignments are edited to reflect the updated IDs.
Editing the command history save file
Similar to Editing the data file, advanced users are welcome to update their command history directly by editing [JAR file location]/data/commandtexthistory.json.
Like the data file, certain edits to this file can cause HRConnect to behave in unexpected ways. Therefore, edit the command history file only if you are confident of updating it correctly.
FAQ
Q: How do I install Java?
A: Download the installer (.exe or .msi) from here. Click on the downloaded file and follow the instructions to install.
Q: Where is my data stored?
A: It is stored in hrconnect.json. This is located in the data subfolder, in the folder you put HRConnect.jar in.

Q: How do I transfer my data to another computer?
A: Install the app in the other computer and overwrite the data file it creates with the file that contains the data of your previous HRConnect home folder.
Q: I don’t see the data files anywhere.
A: You may need to run the app for the first time and run any command (such as exit) to generate these files.
Known issues
-
If your computer has multiple displays, if you move the application to a secondary display, and later switch to using only the primary display, the GUI will open off-screen. The user should delete the
preferences.jsonfile created by the application (in the same folder as theHRConnect.jarfile) before running the application again. -
If you minimize the Help Window and then run the
helpcommand (or use theHelpmenu, or the keyboard shortcutF1) again, the original Help Window will remain minimized, and no new Help Window will appear. The remedy is to manually restore the minimized Help Window. - Running and using multiple instances of HRConnect at the same time will result in unpredictable behavior, including inconsistent data saving and displaying.
Command Summary
Summary of employee commands
| Action | Format, Examples |
|---|---|
| Add Employee |
add id/EMPLOYEEID n/NAME p/PHONE_NUMBER e/EMAIL a/ADDRESS [t/TAG]… [s/SKILL]… e.g., add id/6 n/James Ho p/22224444 e/jamesho@example.com a/123, Clementi Rd, 1234665 t/friend t/colleague s/database s/backend
|
| Clear Employees | clear |
| Delete Employee |
delete INDEXe.g., delete 3
|
| Edit Employee |
edit INDEX [n/NAME] [p/PHONE_NUMBER] [e/EMAIL] [a/ADDRESS] [t/TAG]… [s/SKILL]…e.g., edit 2 n/James Lee e/jameslee@example.com
|
| Filter Employees (by skill) |
filter [s/SKILL]... [t/TAG]...e.g., filter s/frontend t/swe
|
| Find Employees (by name) |
find KEYWORD [MORE_KEYWORDS]e.g., find James Jake
|
| List Employees | listemployees |
Summary of project commands
| Action | Format, Examples |
|---|---|
| Add Project |
addproject pid/PROJECT_ID pn/PROJECT_NAME [s/SKILL]...e.g., addproject pid/1 pn/Project Alpha s/Frontend
|
| Clear Projects | clearproject |
| Delete Project |
deleteproject INDEXe.g., deleteproject 2
|
| Edit Project |
editproject INDEX [pn/NAME] [s/SKILL]…e.g., editproject 1 pn/Project Alpha s/Cybersecurity
|
| Find Projects |
findproject KEYWORD [MORE_KEYWORDS]e.g., findproject Alpha Beta
|
| List Projects | listprojects |
| List All Members of Project |
listprojectmembers pn/PROJECT_NAME e.g., listprojectmembers pn/Project Alpha
|
Summary of assignment commands
| Action | Format, Examples |
|---|---|
| Add Assignment |
assign aid/ASSIGNMENT_ID pid/PROJECT_ID id/EMPLOYEE_IDe.g., assign aid/1 pid/1 id/1
|
| Delete Assignment |
unassign aid/ASSIGNMENT_IDe.g., unassign aid/1
|
| List Assignments | listassignments |
Summary of other commands
| Action | Format, Examples |
|---|---|
| Help | help |
| Exit Program | exit |
Glossary
List of certain technical terms / uncommon words used in this user guide.
Alphanumeric
- Consisting of the letters A to Z (upper/lowercase) and the digits 0 to 9.
Command word
- Word used at the beginning of each command denoting the action performed. Examples:
add,listemployees,filter.
Graphical User Interface
- A digital interface in which a user interacts with graphical components such as icons, buttons, and menus. Example: Windows 11, most websites
Java
- The programming language HRConnect is primarily developed with.
- It can be downloaded from here (scroll down to get to the Java 17 downloads) and installed before attempting to run HRConnect.
JSON
- JavaScript Object Notation, a format for storing and transferring data.
- It can be opened in Notepad, or other text or code editors.
Numeric
- Consisting only of the digits 0 to 9.
- Does not include the negative sign (-), the decimal point (.), spaces, or other symbols.
Prefix
- 1 or more characters, followed by a
/. - Used in commands to indicate a value supplied by the user. Examples:
n/,id/,pid/.